Hi! In this post, I'm going to guide you step by step on adding the WhatsApp live chat button on the blogger Blogspot blog. So, walk with me till the end. And learn more about how to add a chat button on the Blogspot blog.
Why do you need to add a WhatsApp chat button on your blogger blog?
You may know why a live chat button important for your blog, but unfortunately, if you have not heard before about it, so, do not worry! I'm here to help you.
These days WhatsApp is one of the easiest and popular messenger applications in the world. Its popularity almost in all countries except China. And according to researches, Whatsapp will be more popular, in the future, here only reasons that it provides the easiest way of communication in different ways. Such as text messages, video calling, Audio call and audio recorded clips, etc.
In a blog, a WhatsApp chat button can help in many ways-
- Your readers can easily connect to you and quickly solve their particular problems with it instead of a contact us page.
- It generates a funnel where you can keep in touch with your clients.
- It also helps to collect information such as phone number and location. That means it helps in retargeting your clients.
- It brings traffic and subscribers.
- It helps to generate more sales on your blog.
In the technological era, people like an easy way to communicate with others. So, having a Whatsapp chat button, messenger chat button, or any other social media chat button on your blog is the haven way to connect with your clients and helps them.
How to add WhatsApp chat button on blogger/Blogspot blog
In this tutorial, you will learn that way that you do not need coding knowledge. So, walk with till the end. And, follow the given steps to learning 'How to add WhatsApp chat button on blogger blog'.
 |
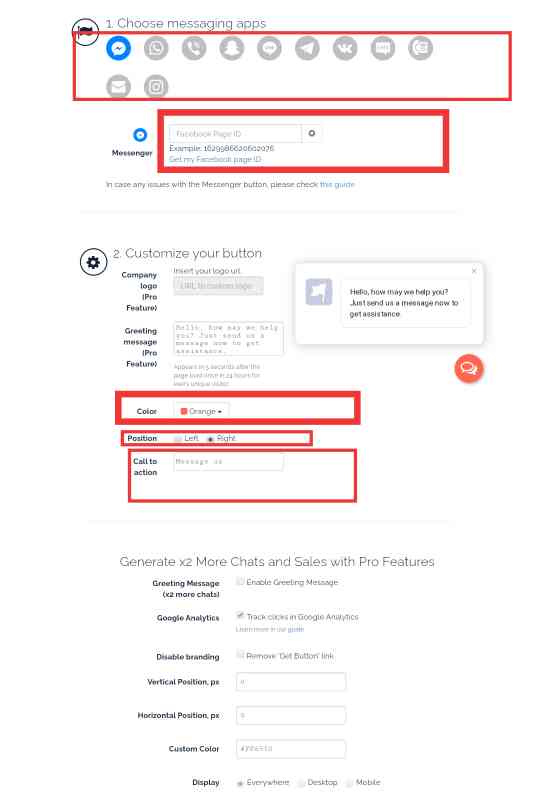
Select your desired live chat button
|
- Choose your desired messaging apps, 'WhatsApp'. ( You can choose maximum two messaging apps).
- Enter your details ( Phone number or Id).
- Select your desired colour (if you have selected two, otherwise you can skip this step).
- Select the position (left or right) where you want to show.
- Give a call to action message like 'How can help you'.
 |
To get your live chat button enter your email
|
- Enter your email to get code.
- Copy the provided codes.
You can also use these given codes on your blog. You have to need to change the highlighted codes with your details.
<script type="text/javascript">
(function () {
var options = {
facebook: "66778766655555555", // Facebook page ID
call_to_action: "How can help you?", // Call to action
button_color: "#FF6550", // Color of button
position: "right", // Position may be 'right' or 'left'
order: "facebook,whatsapp", // Order of buttons
};
var proto = document.location.protocol, host = "
getbutton.io", url = proto + "//static." + host;
var s = document.createElement('script'); s.type = 'text/javascript'; s.async = true; s.src = url + '/widget-send-button/js/init.js';
s.onload = function () { WhWidgetSendButton.init(host, proto, options); };
var x = document.getElementsByTagName('script')[0]; x.parentNode.insertBefore(s, x);
})();
</script>
WhatsApp and Messenger live chat button integrated.
<script type="text/javascript">
(function () {
var options = {
call_to_action: "How can help you?", // Call to action
button_color: "#FF6550", // Color of button
position: "right", // Position may be 'right' or 'left'
order: "whatsapp,call", // Order of buttons
};
var proto = document.location.protocol, host = "
getbutton.io", url = proto + "//static." + host;
var s = document.createElement('script'); s.type = 'text/javascript'; s.async = true; s.src = url + '/widget-send-button/js/init.js';
s.onload = function () { WhWidgetSendButton.init(host, proto, options); };
var x = document.getElementsByTagName('script')[0]; x.parentNode.insertBefore(s, x);
})();
</script>
WhatsApp chat and Call button integrated.
<script type="text/javascript">
(function () {
var options = {
call_to_action: "How can help you?", // Call to action
position: "right", // Position may be 'right' or 'left'
};
var proto = document.location.protocol, host = "
getbutton.io", url = proto + "//static." + host;
var s = document.createElement('script'); s.type = 'text/javascript'; s.async = true; s.src = url + '/widget-send-button/js/init.js';
s.onload = function () { WhWidgetSendButton.init(host, proto, options); };
var x = document.getElementsByTagName('script')[0]; x.parentNode.insertBefore(s, x);
})();
</script>
Only the WhatsApp chat button.
<script type="text/javascript">
(function () {
var options = {
call_to_action: "How can help you?", // Call to action
position: "right", // Position may be 'right' or 'left'
};
var proto = document.location.protocol, host = "
getbutton.io", url = proto + "//static." + host;
var s = document.createElement('script'); s.type = 'text/javascript'; s.async = true; s.src = url + '/widget-send-button/js/init.js';
s.onload = function () { WhWidgetSendButton.init(host, proto, options); };
var x = document.getElementsByTagName('script')[0]; x.parentNode.insertBefore(s, x);
})();
</script>
Only the Facebook messenger button.
- Log in to your blogger dashboard.
 |
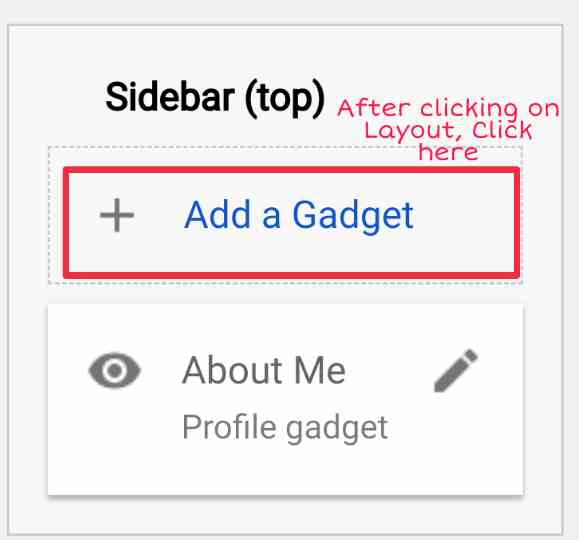
| Add a gadget to enable WhatsApp live chat button |
- Click on layout> Click on Add a Gadget.
 |
Select HTML/JavaScript to ad a live chat widget on your blog
|
- Scroll down and select HTML/JavaScript.
 |
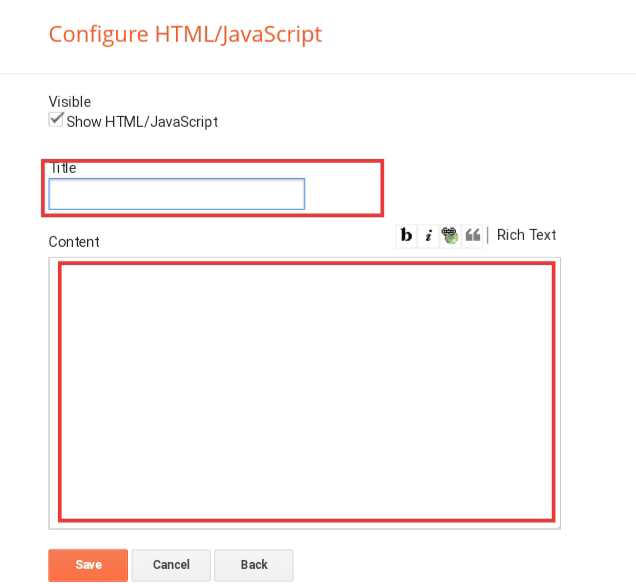
To configure live chat paste your code here
|
- Paste your code on the Content box and save without a title.
Hopefully, your WhatsApp chat button has successfully added on your blog.
Leave a comment on the comment section and tell us how we can improve our work.
Thanks for visiting us......


