Hi, so if you are reading this article I would suggest you first read the Part-1 of this article in that article I taught about the basics of Adobe Premiere Pro and Yeah we are continuing the remaining things because you know I can't tell you guys all of the things in only one article if I do it become too long and you gonna be bore while reading it. So quickly let's take a recap that what we learned in the previous post. in the previous post, we learned about the main interface of Adobe Premiere Pro like - Video setting tab, Timeline, Media bin, Video player, Effects library, Effects setting tab. In this post, we are going to learn about the tools like - Lumetric colour tab, Selection tool, Razor Tool, Title, Export. Before we get started please read the previous article first and then read this cause if you read this first that can confuse you and make it hard to understand I hope this article won't be so long I will try to make it as simple and as short but isn't that mean that this article is not valuable for your time. And yeah if you like it please leave a comment and until I upload more posts you can read my other posts like Free Hotstar for IPL, Free Ahrefs for youtube and website growth, Photoshop tricks And many more.
Earn 20,000/- monthly - Read more
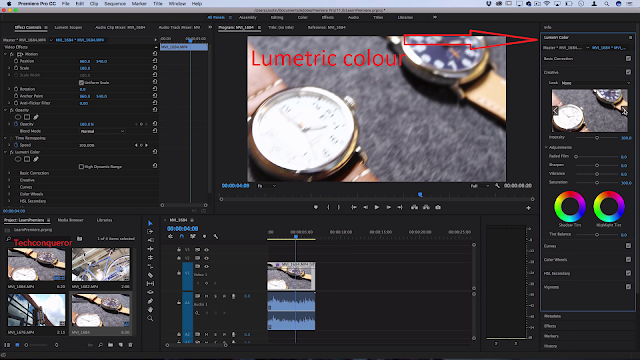
What is "Lumetric Colour Tab"
So, in this tab, we can do things like changing Temperature, Contrast, Adjusting the colour, Shadows, White etc. we also have here a creative tab here you can add different type of filters this is a really important thing for editing you know sometimes when you shoot for a long time At outside After every couple of hours light changes itself because sun changes it's positing just suppose you start your shooting at 11:00 PM and you continue your shoot till 6:PM that means at the starting your video looks so bright and after some hours your video clip look dull it will harm your video quality to prevent this you can use "lumetric colour tab" change your video temperature or adjusting your video colour will make your video with a continuous and not changing colour.
Razor tool
So when your recording your video there are a bunch of mistakes you have done like sometimes you forgot the line so the razor tool is really useful you can remove all the unwanted or unnecessary clips from your video every single video editor have this tool because without it you can't edit your videos this is a very common and most useful tool maybe sometimes you don't use effects or you don't want to add a title to your video but without this, you can't edit your footage.
How to hack wifi password with a phone or pc? - Read here
Title
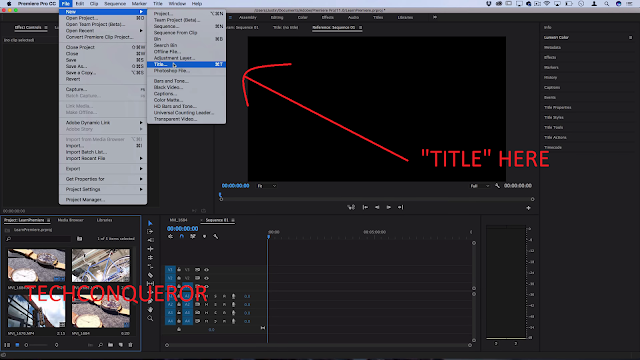
Adding a title is also one of the most important elements in video editing some video needs a title or text in the video. A title can be used for introduction, name, information, or targeting something. I am sure that at any point in life you need this thing. thanks to modern technology and software it became a piece of cake now anyone can do this doesn't matter what device you have like phone, laptop, computer or even online on the internet you can do this without any problem or without any skills but in Software like Adobe I became a bit of tricky but don't worry it's not like quantum physics you just need some clicks choosing your favourite font type your text you can do some more things like changing its size, a colour. So without any further delay let's get started. First, open your adobe premiere pro and then click on file>new>title and there you can edit a lot's of things so do it as you want and it compleated isn't easy in just a few clicks you learn how to do it.
Selection tool
With the selection tool, you can highlight any clip or you can select a bunch of clips. yeah I know it's really short but the selection tool is really helpful for you In several moments you have to use the selection tool I use this tool if I have to move lots of clips at the same time. like some title, video, audio, effects, etc you can't move these clips one by one use a selection tool to solve this issue.
Exporting the video, the Final process
So, congratulations we reached the end or final process of this post now we learn how to export your video if you have edited your video it doesn't matter what level of editing have you done if you are fresher then you've done very simple editing where you removed some unwanted clips, add title and add some effects to your video I mean it's wonderful editing is a really easy skill people think it's hard but that's definitely, not the case if you practice this thing for like 1 month then you can say yourself as a video editor some of our errors show bypassing time so just practice and ask yourself what have you done yet, what you should do which you haven't done, what to learn in further. these lines will always guide to your way and I am also with you in this journey by uploading these tutorials so let's know what to do in this final round.
Export - now what you have to do is go to file, export, media a window pop-up and show you what you exporting you can also see your video you can watch it and check everything is right
at the right side there are a bunch of options like video format. the format is really important to export your video for the platform or device where you want to play in like if you are doing it for youtube then select youtube and also adjust your bitrate select "match source" if you want to export clip in the same way in you original size what, and you can choose an output name change preset settings little bit according to you and then the software will take care about all the things.
Awesome Creative Vidoe effects in adobe premiere pro - click here
Part - 1 click here ( if URL is not opening then visit the home page may be the link is wrong or broken or please inform the team by commenting )
so hi again at this point this post has been ended but not your work so do and learn. Oh! don't forget to leave a comment for us it takes a lot's of effort so please tell me if this is really helpful to you.


